Introduction
Integrating a new API will require some previous level of Python programming (but nothing to crazy, this was actually my first ever python program, coming from a C# and Java background.) The project currently ships with three programmes, ReadingBues.py, NationalBuses.py and NationalRail.py. ReadingBuses.py and NationalBuses.py are both based on the same underlying design, it was intended for bus displays so has a more simplified display. Where as NationalRail.py has a slightly different underlying program design and can be used to show more complex data. If you want to integrate a new bus or rail API you can use either NationalBuses.py or NationalRail.py as your base starting point. Which you choose just depends upon which display style you want. But as I will show below if you send the right settings/start up arguments to NationalRail.py you can make it look very similar to NationalBuses.py. The main differences between the two depends on the animations you want.
Both NationalBuses.py and NationalRail.py program splits the screen into rows. The bottom row always just contains the time the middle three rows contain a service, which is represented in a 'LiveTime' object. The 'LiveTime' object contains all the information and data about a specific service (we will touch on this more later.) This is then contained with in a 'ScrollTime' object which keeps track of the state and animations for the service. What service is chosen to be displayed on each row and when to start and stop animations is controlled by the 'boardFixed' object controller.
This provides layers of abstraction, if you want to implement a new API you only need to focus on retrieving data from your API and turning it into a 'LiveTime' object. This means there is only 2 areas of the programm you will need to change and understand.
							:     Important
						Please have a look at the license agreement connected to the program, you are free to edit the source code to your needs, but can not then distribute the source code your self and you can not use the software for commercial purposes, or otherwise make money from it.  I do however encourage you to fork the Github repository and create a push request, for your alterations to be distributed through the main project for others to use under the same license.
Choosing Your Base Programme To Modify
An understanding of the screen layout is not required to implement a new API but it can help you to best pick which program to modify and use as your base for your new API, you will need to either edit NationalBuses.py or NationalRail.py.
NationalBuses.py

NationalBuses.py splits the screen into 4 rows, each service row is split into three different text boxes/parts, one text box has the service number, the other is the destination and the final is the arrival time. They are printed in such a way that the Destination text box is beneath the other two. The Destination text box also extends underneath the time text box to include the Via message, which becomes visible when the text box moves to the left. If you're API does not provide a Via message and you are unable to make one you can turn off that animation.
NationalRail.py

The NationalRail.py program instead has 5 rows, the bottom is still just a time, the top is a header which can display various things or just be simply turned off/ blank. The middle 3 rows are services The difference to NationalBuses.py is the destination name font will grow or shrink in size depending on the length of the name to fit it in.

Unlike ReadingBuses.py the animation involves removing the 2 original text boxes from the display and then adding 2 new ones, one text box is placed on top and simply says "Calling at:", the other is placed underneath and contains the list of stations the train will stop at. Once again this text box will pan to the left. Before completing the animation and then removing the 2 text boxes before re-drawing the 2 original text boxes to begin the closing animation.
: Note
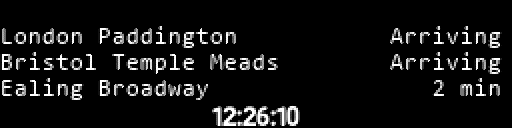
It is important to note that NationalRail.py has many different settings options so you can turn on and off different bits of information if your API does not include them or if you do not want to display them. For example above is the NationalRail.py program with the settings of '-m compact --HidePlatform -q none' sent too it. Which turns off the header, hides platform number and makes the screen 'compact' by only showing the predicted arrival time like the bus display instead of both scheduled and predicted.
Ultimately, you should choose the base program depending on the layout of the information you wish to display and the animations you want to view. But both programs share a lot of similar underlying code and in most cases either can be used.
Stage 1 : Getting API Data (Altering GetData())
Both NationalBuses.py and NationalRail.py has a method called 'GetData()' inside of the LiveTime Class. The purpose of this method is to return a list of LiveTime objects to be used in the program. Navigate to this method, then delete everything in the method but the top two lines, which defines services and sets the last update point. Here you need to write your API parser, methods of doing this will depend entirely upon the API you use, for example some are REST APIs, some are SOAP, some output JSON and some output XML. NationalBuses.py is an example of a REST API outputting JSON, I used the built in JSON library to help me parse, where as ReadingBuses.py is an example of a REST API outputting XML, I used the LXML library to prase XML. NationalRail.py actually uses a library so does a lot of the work for me, especially as it was a SOAP API. Ultimately I can not provide you with instructions on how to parse your API as it will vary API to API.
To prevent needing to hard code in any stop IDs or API keys use the settings/Argument variables, by default you already have the Args.APIKEY and Args.StationID or Args.StopID. If you need to make or remove your own program arguments you can navigate to the very top of the program and add or remove a "requiredNamed" argument.
The goal of 'GetData()' method is to output a list of LiveTime objects in the variable services, hence the return services. To return a list of LiveTime objects instead of your own API objects you must convert/ cast the objects from one type to another. We will do this in the LiveTime constructor.
Stage 2 : Converting To LiveTime Object (Altering LiveTime Constructor)
The constructor of NationalBuses.py can be seen above, Data is the raw object directly from the API. Index is just the length of the Services list at that point in time, it's used if you want to show the index position of a service (ie, 1st is next to arrive, this assumes that services are given by the API in the order they will turn up, not true for all APIs) if you do not intend to use this feature you can simply remove it. NationalRail.py passes both Data and ServicesC, this is because you have to make two API calls to get all the data about the service, so the data is split between 2 objects, simply pass as many objects as needed, so feel free to delete.
Inside of the constructor alter all variable assignments such that it matches your own API object, the idea is to map your own custom object to the LiveTime object. Below shows the description for each property in the LiveTime Object.
NationalBuses.py LiveTime Object Properties
| ID | An unique value to identify the service, this currently not used anywhere in the program so can be set to any arbitrary value |
| Operator | This is the name of the operator running the specific service |
| ServiceNumber | This is the name of the service, for example 22 or Indigio line. |
| Destination | This is the terminating destination of the service/ where it's going to. |
| SchArrival | This is the scheduled arrival time/ when the time table says its meant to of turned up. In the string format of 24:00 |
| ExptArrival | This is the predicted arrival time/ the live actual estimate of arriving. In the string format of 24:00 |
| Via | This is the message which will scroll across the screen, it normally holds the "Via message" but can be any text you want to scroll during the animation. If you do not have message you want to scroll through or the API does not provide one you can turn the animation off with the --ReducedAnimations tag. Making this property optional. |
| DisplayTime | This is the string which will be shown on the display, storing the time for when the bus is to arrive. So long as you make sure SchArrival and ExptArrival is in the correct format you can call the same method "GetDisplayTime()" withouth having to make any alterations. |
NationalRail.py LiveTime Object Properties
| Index | This is the index position of the service, for example 1st is the next bus to arrive and so on. |
| ID | An unique value to identify the service, this currently not used anywhere in the program so can be set to any arbitrary value |
| Operator | This is the name of the operator running the specific service |
| Destination | This is the terminating destination of the service/ where it's going to. |
| SchArrival | This is the scheduled arrival time/ when the time table says its meant to of turned up. In the string format of 24:00 |
| ExptArrival | This is the predicted arrival time/ the live actual estimate of arriving. In the string format of 24:00. This is the string which is shown on the right of the display (orange section in above images) |
| CallingAt | This is the message which will scroll across the screen, it normally holds the "Calling at message" but can be any text you want to scroll during the animation. If you do not have message you want to scroll through or the API does not provide one you can turn the animation off with the --ReducedAnimations tag. Making this property optional. |
| Platforms | Holds the platform number the service will stop at, if you do not care for the platform (for example a station only has one platform) you can set this to be an arbitary value and then send a tag of '--HidePlatform' to hide it from the display. Making this property optional. |
| IsCancelled | A Boolean which says if the service is cancelled or not. Currently this variable is not used anywhere and can be ignored.. |
| DisruptionReason | A string saying why a train was delayed, currently this is not used anywhere and can be ignored. |
| DisplayText | This is what will be in the right hand side text box on the display (blue sections in the diagram above) |
Transport For London Example
For example, if I wanted to integrate Transport for London's bus & train API I would have written my API parser in the the GetData() method and now passed my custom object to the LiveTime constructor. The object diagram for TFL's bus instance can be seen below.
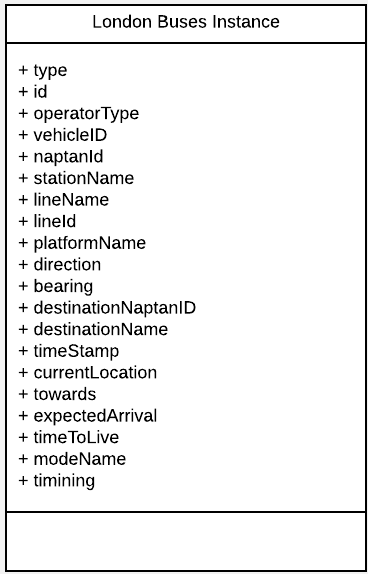
As you can see, Transport for London's API gives us a wide array of object properties/ attributes about this bus. We need to match each property with the closet related LiveTime object property. For example, self.ID would match with our "ID" property and self.ServiceNumber would match with our "lineName". Some attributes we do not have for example self.Operator should store the operator name but our API does not provide the operator of the bus service, so we can use a string literal/ place holder value instead. This API also does not provide a "Via" message for the service, we will either need to make our own message or just use a place holder value again. You will find that a lot of the data the API provides is useless for example timeToLive or platformName is not related to any LiveTime object attribute so that is simply ignored.
SchArrival and ExptArrival are both expecting a time format of 24:00 in string format. If your API outputs a time in a different format you will need to either convert it into the correct format or alter the 'DetDisplayTime()' or 'GetExptTime()' function (depending upon which program you are modifying) to support the correct date time format your API outputs.
London Buses Example Alterations
Above is my altered program to now work with the Transport for London API, as you can see I have mapped the properties to that of the LiveTime object and altered the GetDisplayTime() function to match the same date time formate outputted by the API.
That's it you've integrated a new API
That's the basics of integrating a new API, you should only of needed to change 2 specific parts of the program, if you need to change the look/ design of the program further first check there is not a setting which already does what you want if not feel free to contact me for advice on where to start.